Create sparkling decor for an awesome teacher appreciation gift.

Creating sparking and dazzling decor is so fun and easy with Glitter-It. I love it for creating pieces all year round to celebrate occasions, holidays and TEACHERS!
Materials and Supplies Needed
- Glitter-It! from Beacon
- Glass Jar (TALL is better) with Lid
- Yellow Chunky Mixed Glitter
- Brown Card Stock
- Scissors
- Twine or Ribbon
- Pink and Black Acrylic Paint
- Paintbrush

Directions for Using Glitter-It!
Using Glitter-It is as easy as 1-2-3. I have found that it works the very best when being applied to clean, dry glass with chunky glitter!
- Unscrew cap of Glitter-It! and pour a small amount into vessel (gumball machine). Swirl around to coat the entire inner surface. Add more if needed. Drain Glitter-It! from vessel before adding glitter. Be sure that the entire inner surface is well coated with Glitter-It! before adding glitter.
- Immediately add about glitter. Rotate and shake vessel around until the inside of the vessel is completely covered with glitter. If necessary, add additional Glitter-It! and glitter until all areas are covered.
- Turn vessel upside down and shake away any excess glitter. Let dry!
Let’s go through the directions in more detail!
Directions for Glitter Jar Pencil Decor
I like to put down paper towels or parchment paper before starting to protect my surface from any splashes or spills. Of course when working with glitter – sometimes I throw caution to the wind and just go for it.
Step One
Take lid off of the jar and pour about a half bottle of Glitter It in then put the lid back on. Swirl it around until the surfaces have all been covered then take off lid and pour remaining back into the container of Glitter It.

Step Two
Pour glitter in the jar and shake it all around to cover the surfaces. I find that chunky glitter gives a more full effect over fine glitters.

Step Three
While the inside is drying, on the outside create the pencil eraser. To do this neatly, place a piece of tape around the jar leaving the bottom part to be the size you want the eraser.

Paint the bottom of the jar pink and when it is dry, remove the tape. If you want to take precautions of paint chipping, add a layer of decoupage.

Step Four
Create a cone from brown card stock and paint the tip black for the lead of the pencil. Add glitter to the edges if desired to give the pencil the look of just coming out of the sharpener. This can be done with any adhesive.

Step Five
Add a black line (can use paint or a paint marker) to add any desired details. This would be a good time to add a teacher’s name to personalize the gift.

Tie a bow if desired to add a special little extra touch.

Glue the cone to the top of the jar to complete the project. It is so cute!
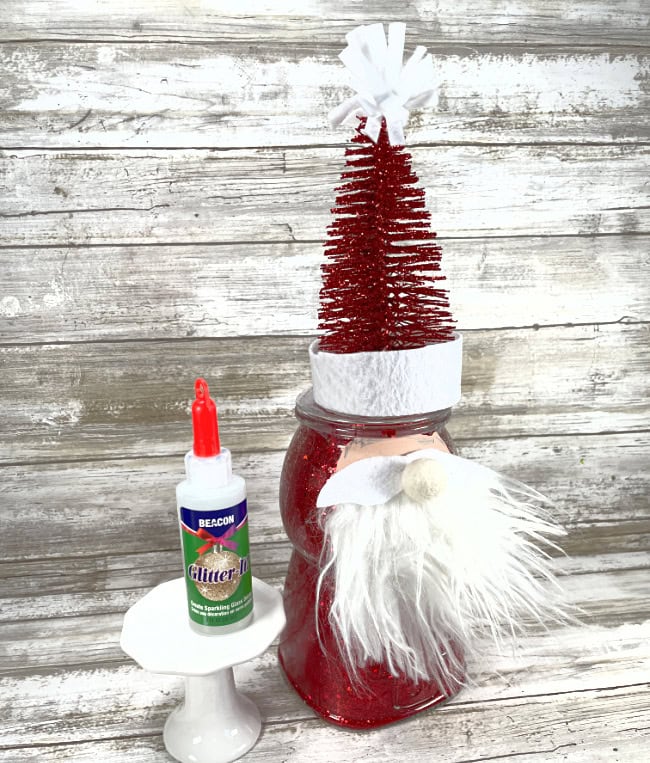
More Glitter It Project Ideas
Here are two more really adorable Glitter It project ideas for you. The elf is adorable and perfect for the holidays. I think she is actually cute enough to have out all year round. The sparkle of the pink glitter makes my heart so happy.

Santa is made from a gumball machine and simply darling. The red glitter is stunning.
Sharing is Caring!
Too busy to make this right away?! Pin it for later! Pin this project to your favorite craft board on Pinterest and it’ll be waiting for you when you’re ready.

I would really love to hear what you think about this awesome gumball machine Santa! If you try it out, I would sure like to see it! Share on Instagram, Facebook, or leave a comment/photo on the project pin on Pinterest! #LauraKellyDesigns
XO,
Laura
Love your creativity and what you do. I do not have a creative hair so I enjoy it when I see others do it.
I visited you via Creatively Crafty Link Party #377
If you are not already part of SSPS, this is a personal invite to hop over and come and share your posts with us at Senior Salon Pit Stop, every Monday to Saturday.
See my entries: 18+19 and then navigate to the bottom of my page for the Senior Salon Pit Stop linkup, we hope to meet you there virtually.
How cute! This is perfect for teach appreciation day! I love it.
I would like to share my excitement about the recent changes in the field of crypto license in Czech Republic. This is really great news for all of us who are passionate about the world of digital assets. I have recently spent some time researching the new requirements for obtaining a crypto license in the Czech Republic, and I am thrilled with the way the country is approaching this issue. First of all, the process of obtaining a license has become more transparent and understandable. The authorities are actively cooperating with the community, holding open discussions and taking into account the opinions of market participants. The new regulations also strike a balance between safety and innovation. This is important in order to stimulate the development of the cryptosphere in the country, without forgetting the protection of investors’ interests and the stability of the financial system. As a representative of the community, I am proud of the way the Czech Republic is embracing the challenges of today’s financial world. It is a great example of how a country can actively innovate by supporting the development of the cryptocurrency space. What are your thoughts on this issue? I would be happy to hear your opinions and share your experiences! Together we are creating the future of cryptocurrency in the Czech Republic https://gofaizen-sherle.com/crypto-license/czech !
Guten Tag zusammen! Mein Freundin feiert bald Geburtstag und ich möchte ihr mit einem atemberaubenden Blumenstrauß eine Freude machen. Hat jemand Vorschläge, wo ich den besten Blumenstrauß kaufen kann?
Hallo Freunde! Blumen sind zweifellos eine zauberhafte Geste für einen geliebten Menschen. Sie zeigen nicht nur ihre äußere Schönheit und ihren betörenden Duft, sondern drücken auch Ihre Zuneigung zur Person aus. Vielleicht möchten Sie einen Blick auf https://myglobalflowers.de/ werfen. Die örtlichen Geschäfte bieten stets frische und wunderschöne Blumen an, und die Auswahl ist riesig. Sie werden sicherlich das Passende finden.
Research organization proves challenging for you according to the latest information. An outline functions as an important tool to maintain your focus on the task. [Link deleted]
Research organization proves challenging for you according to the latest information. An outline functions as an important tool to maintain your focus on the task. [Link deleted]