Creating customizing and adorable birthday decorations has never been easier.
Emojis are such a fun way to create and express feelings into art. Making the stencils with Ikonart is so easy and the best part is THEY ARE REUSABLE! After I show you how I made this fabulous birthday garland decoration with the stencil, I will share how I used them to decorate cookies too! Let’s make an adorable Birthday Garland DIY!

Beginning a new crafting technique can be daunting but please don’t fret! The Ikonart Custom Stencil Kit comes with everything you need to get up and going right away. Save 15% with the code LAURAKELLY! This is what comes in the stencil kit!
- Quick Start Guide
- Printed Inkjet Sample
- Finished Stencil Sample
- Inkjet Printer Film
- Laser Printer Film
- Ikonart Stencil Film + 2 Clear Exposure Sheets
- Exposure Stand + UV LED Light
- Ikonart Clipboard
- Ikonart Plastic Squeegee
- Coupon codes for free fonts and designs
Making the Stencil
Step One – Print Your Stencil
The very first thing to creating a custom stencil is to print (or doodle) your design. High quality printing in 100% black will give you the best film positive to block out the UV light. This really helps when it comes to washing out the stencil when it comes time. I actually doodled mine using a BLACK permanent marker and it worked great. I scanned it to create a free printable of the designs in case you want to use them!

The kit comes with amazing and awesome directions that have all of the tips and tricks for printing artwork.
Step Two – Expose Your Stencil
The next step in make your own cookie stencil is to expose your stencil. This requires created a stack of three pieces on the base of your stand. Place the blue Ikonart Stencil Film on first – texture side up. Next place your printed transparency on top of the film so that what you see is what you want your stencil to look like. This would matter if you had words and didn’t want them to be backwards. The last piece in the pile is the clear exposure sheet. Rub over them all to make sure the stencil sheet is tight against the transparency. Turn on the exposure light for 35 seconds when using the laser film.

Step Three – Rinse Out Your Stencil
Clip your stencil on to the clipboard that came in the kit (shiny side down) and take it to the sink. Run hot to very warm water over it until the mesh part of your design is COMPLETELY clear.

Hang your stencil to dry. It will take about 45 minutes to an hour. Stencil must be dry before moving forward.

Step Four – Post-Expose Your Stencil
The final step to finishing your stencil is to post-expose it. Place it back on the stand (texture side up) and turn the light on it for at least two minutes. This makes the stencil more durable so it will work better and be used over again.

If it easier for your project (like it is for this one) then cut the stencil into smaller parts.

Making the Birthday Garland DIY
This is the part where the stencil brings your project to life. It is fun to be able to create from scratch to be able to get the exact design desired
Garland Material List
- 5-6 Wooden Circles (3 inch diameter)
- Yellow Paint – I used Emoji Yellow Color Shot Spray Paint!
- Black Paint
- Stencil Made with Ikonart (Above)
- Ikonart Plastic Squeegee
- Glue
- Twine
- Mini Clothespins
- Scissors
- FREE Printable Party Hats
- Garland
Garland Directions
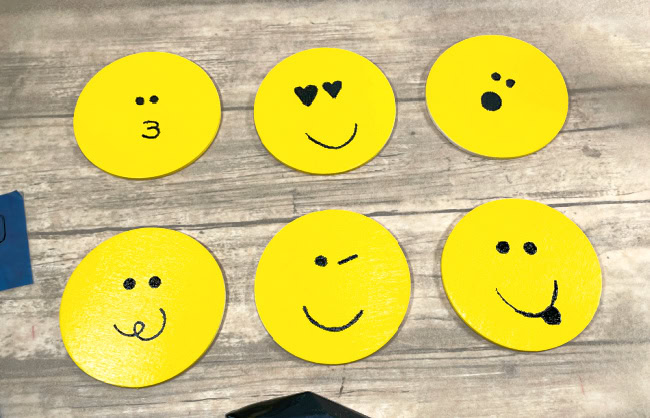
Start by spray painting wooden circles. These are 3 inches in diameter but you could use any size. Just make sure your stencil is designed for the size of your circles. Let the paint dry.
Carefully place your stencil pieces on the wooden circles.

Next, use the Ikonart plastic squeegee to apply the black paint.

Once the black paint is dry, glue the party hats to the tops of the circles. Let the paint dry.

You can use the free download for party hats or make hats of your own. Grab the free download if you’d like it.

Use clothespins to hand the part emojis onto a garland. This could be as long or as short as you need it to be.

Use the Stencils to Decorate Cookies
It is so much fun to use the stencils to decorate cookies too! You can get all the deets about how I decorated these right here on the blog.

Sharing is Caring! Too busy to make this right away?! Pin it for later! Pin this project to your favorite craft board on Pinterest and it’ll be waiting for you when you’re ready.

I would really love to hear what you think about this stencil making idea! If you try it out, I would sure like to see it! Share on Instagram, Facebook, or leave a comment/photo on the project pin on Pinterest! #LauraKellyDesigns
This post contains affiliate links. If you make a purchase, it is no extra cost to you but supports me and my small business.
XOXO,
Laura