How to Paint an Outdoor Birdhouse
With springtime in the air and birds chirping loud enough in the mornings to wake a person up, it is the perfect time to paint an outdoor birdhouse. I am really excited about this project for two reasons, well really three. First of all, I made the birdhouse at the home show in Denver using recycled wood, like with a hammer and nails. Second, I painted it for one of my kiddo’s teachers who will LOVE having it outside her classroom window. Third, and most exciting, I used DecoArt’s Patio Paints (for outdoor projects) for the first time and LOVE them.

What will you need to paint bird houses from recycled wood?
To make this project, Paint and Outdoor Birdhouse, you will need the following materials and supplies.

- Patio Paints from DecoArt (Listed are the colors I used!)
Cloud WhiteAzaleaGeranium RedPumpkinSunshine YellowCitrus GreenApple GreenRobins Egg BlueSummer Sky BluePetunia PurplePinecone BrownWrought Iron Black
- Paint Brushes
- Water for Rinsing Brushes
- Birdhouse (Wood)
- Wooden Cut Outs if Desired
- Ball for Rest if Desired (Wooden)
Before I show you the steps I used to paint my birdhouse, I want to share some things about the paints. They are non toxic and water based. The create a superior coverage. They are water resistant. You can use them on concrete and other outdoor surfaces. No sealer is required!

A few tips…
Shake well before using. Apply 1-2 coats depending on the opacity desired. Do not expose to moisture for 72 hours. Clean up with soap and water.
Directions To Paint an Outdoor Birdhouse
Before creating flowers on the birdhouse, I painted the black and white stripes on the edges.

I then painted the roof of the birdhouse black. It was amazing to see how amazing this paint covered the surface. I only had to paint one single coat to get perfect coverage!

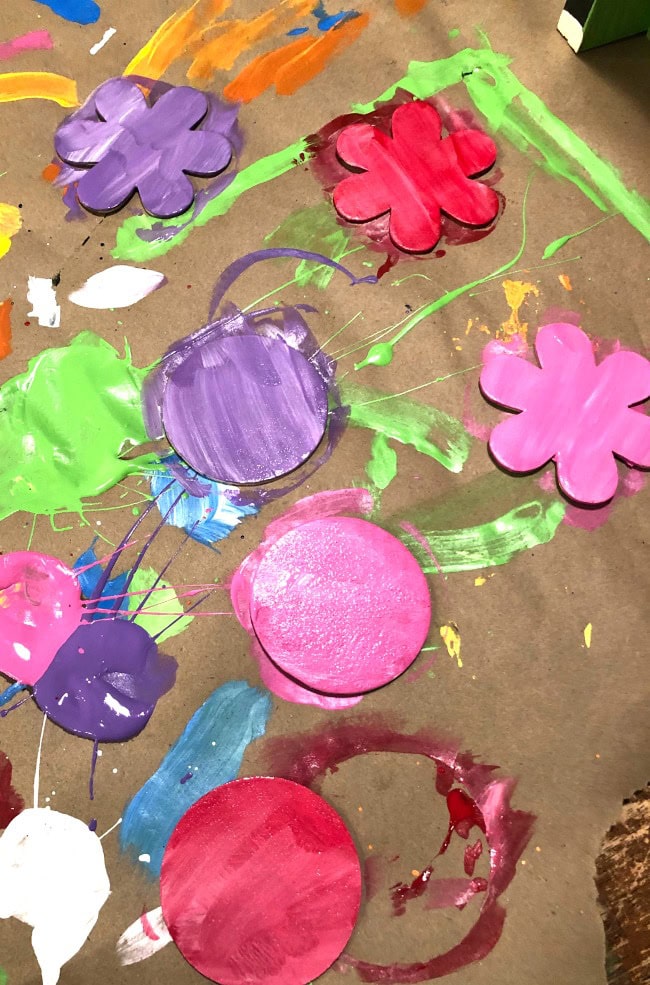
I like to start with the basic shapes that I want on my piece. For this project, the basic shape is the circle that is in the middle of each flower. I painted circles in a variety of my favorite colors.

I added an outer circle to the circles to give the flowers extra colors then added an outside ring with bumps. To get a little texture, I mix a tiny bit of white paint in to the bright colors as I go.


Then I filled in the open space with green on the bottom half and blue on the top. In some places the paint was painted on thicker than others. This is a preference. I also added dots to the centers of the flowers.

While the green and blue paints were still wet, I added a little white to get that white-washed look.

Paint your cut out wood pieces if you are choosing to add them to your project.
Once everything is totally dry, use a strong glue to add the cutouts to your birdhouse. I recommend E6000.


I added a round painted wood piece so the birds will have a place to rest before going into their new home.

Ta Da! It’s a beautiful, bright and cheery birdhouse!

I know she is going to love this so much! I think giving teachers gifts that live on year after year are awesome.
How Much Paint?
If you are wondering how much paint to buy for an outdoor project, this information should be helpful. COVERAGE: The surface will determine how much paint is needed. However, the following approximations can be used: concrete – 2 ounce bottle covers 6-1/4 square feet, 8 ounce bottle covers 25 square feet, 32 ounce bottle covers 100 square feet.
Why Painting with Kids is a Good Idea
Painting with kids is so much more than a craft project or simple activity. It is a way for kids (of all ages really) do many very important things. Here are some fabulous reasons to get kids painting.
- It helps them convey ideas and share.
- Painting gives kids an opportunity to express emotions — even ones that might be hiding deep inside.
- It uses several senses to paint and through that kids make connections.
- Exploring color, the process and the outcomes teaches cause and effect.
- When kids made handmade masterpieces, it boosts confidence.
Preparation Steps for Painting with Kids
One of the biggest factors in creating successful paint crafts with kids lies in the prep. Here are four things you can do to prepare for a great time crafting.
- Expect a little mess. Prep your area knowing that paint can spill, drip and splatter. Cover your work are with kraft paper before starting.
- Provide aprons for the kids. If you don’t want to but them, they can wear old adult sized shirts as aprons.
- Have paper towels nearby and ready if needed.
- Know the dry time of the project before starting. If there are several steps, there might be a dry time involved. Have a puzzle or activity on hand to do during that in between time. You can grab free ones here on the blog.
YAY for Handmade!
Laura
PS:
If you like painting gifts for teachers, you might like this Personalized Clipboard project using DecoArt’s Multi Surface Paints too!

This post contains affiliate links.